Tuesday, December 2, 2008

Setting up Scheduled Tasks on Windows XP

You may not know what a Scheduled task is, So I will tell you.

A Scheduled Task is something that you can setup to run at a certain time. For example, maybe you want to open Macromedia Dreamweaver every Monday at 4:00PM. Well, I will show you how.

Firstly, Open up Control Panel.

Then look for Scheduled Tasks and click the icon.

That will then bring up the Scheduled Tasks window.

Now to setup a new task, We need to press: Add Scheduled Task,
That then brings up the wizard. This wizard will help ypu setup your task.


Press next.


Select the application you want to run, and press next.


Enter the name of the task, select when you want it to run.

Select the exact time, and what day you want it to run on. You can select more than one day. Then hit next.

And thats it. Thats how you setup a Scheduled Task on Windows XP!

By following this simple tutorial, you should have learnt how!
Read rest of entry

Speed Up XP Boot with Boot Defrag


Speed up your boot time by enabling a Boot Defrag. Enabling Boot Defrag places all boot files next to each other on the disk to allow for faster booting. This should be enabled by default, however it can be changed inadvertently by various software or other means. If you experience a slow boot, you should definitely check to make sure that your Boot Defrag is enabled.
To Enable or Disable the Boot Defrag, do the following:

click start->run->regedit

Navigate to the following key:

HKEY_LOCAL_MACHINE\SOFTWARE\Microsoft\Dfrg\BootOptimizeFunction

Note: If you have a hard time seeing the images in thie guide, simply click on the image and you can view it larger
On the right hand side, locate Enable and double click on it and give it a value of Y to enable Boot Defrag or N to disable Boot Defrag

Reboot your computer
Read rest of entry

How to convert from FAT32 to NTFS with Command Prompt without reformating

To see what is the format of the tabulation of your HardDrive, go to My Computer, select a Hard Drive then click on Properties.

1. As a safety measure, you might want to make a complete backup on a CD or DVD. A problem might occur, even if it's usually rare.

2. Click on the Start Menu and select RUN. Type in: cmd in the dialog box.


3. In the Command Prompt Window, type in:


Convert L: /FS:NTFS     (L: is the letter of the drive)

4. If some files are currently in use, the command prompt will probably propose you to force a temporary unmount. If you're trying to convert your main drive with Windows installed on it, you will have to reboot your computer. In that case, the conversion will occur when rebooting.

Read rest of entry

denial of services and their prevention

Taking advantage of a known problem with the Operating System or any running services on the target, a good programmer can build an application that sends some data that causes the targeted system to crash.

The worst case scenario is not when a hacker crashes a service, but when it finds a way to maximize the CPU usage causing a total malfunction on the system.


1. SYN Floods

You should know that when a client and a server want to transmit data over the TCP protocol, a three-way handshake occurs:


  • The client asks for a connection with a SYN (synchronize) package
  • The server replies to the client with a SYN-ACK (syn-acknowledgments)
  • The client sends a third packages as a ACK and the transmission of the data starts.

The SYN flood works by sending SYN packets from false IP addresses (IP spoofing). The server replies to that false IP address with an SYN-ACK and then waits for ACK. Doing this many times will cause the server to end up in the impossibility of opening new connection, creating a network congestion.

Another SYN flood attack involves sending a packet to the server, spoofed with the server's address (let's say the server's IP is 192.168.1.20 then you send a SYN packet from 192.168.1.20 to 192.168.1.20). Repeating this many times will make the server sending SYN-ACK and ACK to itself, blocking it.

Patches to this kind of attack used a connection number limit from the same source/timeframe. SYN cookies also hold down the handling of the packets until the sender's IP address is verified.

2. SMURF attacks

In this kind of attacks a massive amount of ping traffic (ICMP echos) is sent to the broadcast address of the network. The source IP address is spoofed to look like the target's. If this traffic is forwarded to the network, all hosts will reply with an echo to the target, believing that they receive an echo request (PING) from it. In a large networks, a targeted server for example can be flooded by hundreds of replies at once. By sending the spoofed packet several times, the server will be flooded until it crashes from the overload.

This kind of attacks were mostly patched by making the routers not forwarding broadcast directed traffic to the network.

3. LAND attacks

LAND attacks take advantage of opened network services on the target. By using a port sniffer, opened ports and services are found out. Then spoofed packages are sent with IP address source the same as IP address destination (server's address) to make it reply to itself. Let's say for example that it uses SNMP (simple network management protocol - service used to report network and system's usage). By making a SNMP service to reply to itself continuously it finally crashes.

4. Ping of death

This type of DoS attack takes advantage of a known issue with Windows 9x and older NT stations, as well as Linux prior to 2.0.32. Many routers and printers older then 1998 are vulnerable to this too.
It works by sending a malformed format of a ping packet. Usually, ping packets are small-sized (like 32bytes or 64bytes by default). Older Operating Systems and other devices could not handle ping larger than the maximum IP packet size of 65535 bytes (defined by RFC 791). By sending a large packet or a malformed one, any system that doesn't know how to handle it crashes (eg. in Windows 9x a blue screen of death was generated).
Patches are available on the web for any old operating systems or devices.

5. Ping flooding

This is probably the simplest DoS attack that exists. It is also the most used. It works by overwhelming the target with echo requests (pings) having large packets. The target has it's bandwidth occupied by these requests already and floods itself by starting to reply back. Of course, the attacker must have a larger bandwidth than the target (for example flooding a dial-up user from a 1Mbps connection).
With the increase of the servers' bandwidth, this type of attacks became useless for an ADSL user for instance.
The "problem" was solved by using multiple hosts, creating the first DDoS attacks (distributed denial of service).
DDoS attacks work by owning let's say 50 boxes each with 1Mbps bandwidth. Then the attacker uses all of them to ping flood the target, creating a great amount of traffic on the host.
Stacheldraht for example is a console that connects to owned boxes running Stacheldraht server. It then coordinates the attacks from a single point.
The solution to this type of attacks is the firewall, which filters any echo replies from being sent. Of course, firewalls can be crashed as well.

6. Fraggle attacks

A fraggle attack takes place when an attacker send massive amount of UDP echo data to network broadcast addresses, using a the target's IP as the packet's source. All hosts reply to the target, flooding it. It usually uses UDP PORT 7 (echo). This code was written by the same person who written the smurf attack.

7. Teardrop attacks

This attack involves packets sent by the attacker to the target with oversized payloads. This exploits a bug in the TCP/IP protocol stack, crashing the system. Only Windows 3.11, 95 and Linux prior to 2.0.32 were vulnerable to this kind of attack.

8. Other type of attacks

Other type of attacks involve application flooding, like IRC bot raw line which usually crash Windows boxes running mIRC or any other client. These attacks are based on a greater number of raw socket transactions than a computer can handle.


HOW TO PROTECT YOUR COMPUTER FROM ATTACKS


First of all, firewalls (in networking) represent the virtual barrier between your computer and other parts of the network (usually the Internet).
From the home-users point of view, a software-type firewall represents the best choice. You should also know that hardware firewalls exist too in the form of dedicated equipments that are placed to form demilitarized zones (DMZ). That means that it forms a border between the local network and usually the Internet (depending on the needs). These equipments are expensive and require good configuration knowledge - that is why they are considered professional solutions implemented in large networks.
Overall, a firewall's main goal is to filter unwanted traffic that goes both in and out.
How does it do it?
Well firstly, a good firewall software will override application's permissions. This means that it will ask for your approval to allow an application to access the outer network. You can deny the access for the application that you don't want to send information over the network (useful when infected with a Trojan virus that will connect to other hosts and take control of your station). This rule is applied for all programs even usually trusted. In the picture bellow you have an example applied to Yahoo Messenger.


Secondly, a firewall blocks common DoS (Denial of Service) attacks - in theory - that are sent to your computer. This includes SYN floods, Ping of death and many other known attacks. It works by ignoring all traffic that resembles with a known pattern and further ignoring the sender for a period of time. I know that these kind of organized attacks look like a long shot, but you will be surprised to see how many scan your computer for different stuff and try to get access in. Here is part of a firewall log to get a picture of what's happening when connected to the Internet.


Another useful thing that a firewall usually does is filtering the ports. Usually if you have an application that acts like a server, it opens some ports (virtual access points for data) to listen for requests from the network. Someone could "plant" such an application in your PC without even knowing it. And if it's some kind of management software, an antivirus software would not find it suspicious and block it. By doing this, people can gain administrative access in your computer. A firewall will alert you whenever an application starts listening for connections from the network. This comes in two ways, of course. If you do have a server-type application like a FTP server or a remote administration tool, your firewall will usually block it by default. You have to search in the settings of the firewall (these menus come in different forms depending on the producer) and open that port manually. It's simple on most home-user dedicated firewalls.
If you don't use any firewall software you should get one as soons as possible. That if your computer is connected to any kind of network or the Internt, otherwise it's useless.
I personally recommend ZoneAlarm (it exists in freeware version and a paid one that comes with an antivirus too - you can get it fromhttp://www.oldversion.com/program.php?n=zalarm) or Sygate Personal Firewall (get it from http://www.oldversion.com/program.php?n=sygate).
After installing it, the first thing that you should do is to set up your program access rights. So when you are asked for confirmation (let's say) for Mozilla Firefox to access the Internet, click the options that tells to use this setting next time and accept it. It will never ask you again for that confirmation.


Read rest of entry

7 Tricks To Make Working With Windows Command Prompt Easier


winlogo.jpg


1 - Drag and Drop - Being able to open a command prompt from Windows Explorer right click context menu, to the current directory is a big time saver. But what about opening a command prompt to a file location?
Instead of hacking away at the registry to provide this functionality, the easier method is to use drag-and-drop.
After using Command Prompt Here to open the prompt to the current folder location, just right click and hold on a file, then drag and drop it on the command prompt window.

Unfortunately, drag and drop only works in XP and not Vista. Instead you can use Vista's copyfile name and path as text feature as an alternative.
2 - Open Windows Explorer Window From Command Prompt -Now that you know how to open the command prompt from Windows Explorer, how about reversing the process.
Just type the following command at the prompt and press enter:
explorer .
NOTE: Make sure to include the dot (period) after the command.

To open Windows to the parent directory that of the current directory you are at (one folder above), just type the following command:
explorer . .
Or to open Explorer to a different directory:
explorer c:\windows\system32
3 - Copy and Paste - just like using any Windows program, copy and paste text, to and from the command prompt window is no different.
First, make sure Edit Options are enabled by opening a command prompt window and clicking on the icon in the title bar and selecting properties.
Note: If you are unsure how to open a command prompt, click on Start \ Run… and enter cmd in the Run window.


Then make sure QuickEdit Mode and Insert Mode are checked and click OK.

Once edit options are enabled, you can copy (after highlighting text) and paste to and from the command prompt to any window by right clicking, and selecting either Copy or Paste from the context menu.
4 - Change Directories The Easy Way - Navigating around the file system from the prompt requires using thedir (directory) command to 'see' the contents of a directory. But if you are just moving forward through the current directory, there is an easier way to see folders using the keyboard.
To do this, use the Change Directory command by typing cd and pressing the space bar once, then continually press the Tab key to scroll through the list of folders.
Once you see the folder that you want to navigate into, stop and press enter.

.
5 - Search For Text - If you execute many commands,  after a while the window can fill up with a lot text. To quickly locate text output from a command, you can easily search for it using the Find dialog bog.
Click on the icon in the title bar (of the command prompt window you are working in) and select Edit,  thenFind… (you can also right on the Title bar select Edit \ Find ).
In the Find dialog box, just enter the text you are looking for, click on Find Next, and the selected text will be found and highlighted.
6 - Change The Window Title - Sometimes one command prompt window is not enough. You may have situations where multiple windows are needed to perform several tasks. At times this can lead to confusion as to which window is which.
To make it easier with identifying different command prompt sessions, you can name each window with different titles by using the Title command. All you need to do is enter the following at the prompt:
TITLE [string]
Where string Specifies the title for the command prompt window.
For example, to rename a window that is being used with the net stat command, enter the following command and press enter:
title NET STAT

7 - Open Command Prompt As Administrator In Vista - With Vista, to perform certain functions, you need to have Administrator privileges.
To always open a command prompt as an Administrator, follow these steps:
  • Right-click on the desktop and select New \ Shortcut.
  • At the next screen enter %SystemRoot%\System32\cmd.exe (in the Type the location of the item field) and click Next .
  • At the next screen, give the shortcut a name, such as 'cmd prompt' and click Finish.
  • Now, right click on the shortcut you just created and select Properties .
  • Then click on the Advanced… button (at the bottom).

  • Now, just click the check box next to Run as administrator and click on the OK button twice to exit the Property window.

When you double click on the shortcut, you'll be prompted by UAC (User Account Control). Just click the Continue button to confirm and you will have a command prompt running with Administration rights.


Read rest of entry

How To Restart Windows Explorer Shell Without Rebooting Windows


While Windows, overtime with XP and Vista have become more stable with not crashing, every now it  is freezing and becoming unresponsive while using Windows Explorer or some Desktop function.
The usual remedy is to reboot, sometimes losing data before you had a chance to save and close an application. In reality, when you end task Windows Explorer, only the process for Windows Explorer shell is terminated, leaving any applications not effected and still running.
Instead of restarting Windows, either on XP or Vista, you may be able to recover by restarting Windows Explorer Shell from Task Manager following the below steps.
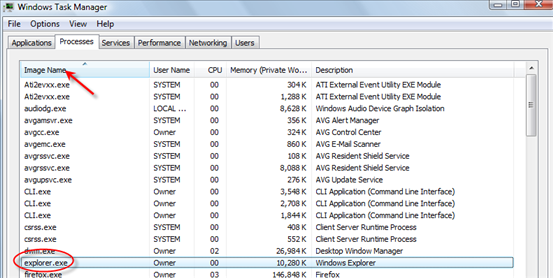
When Explorer's shell freezes, just hit Ctrl + Alt + Del to bring up Task Manager.
After Task Manager opens, sort the processes by clicking on the Image Name column (arrow) then look for theexplorer.exe process.
(NOTE: screenshots are from Vista, but the follow steps also apply to XP)
shell1.png

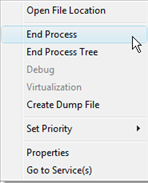
Right click on explorer.exe and click on End Process.

shell2.png
Then click Yes in the Task Manager Warning window to end the process. This will cause the desktop to disappear. It's possible that any open application(s) will still be visible, while applications that were minimized will not be shown.
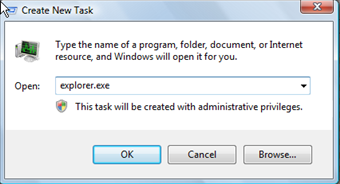
At this point Task Manager will remain open. Click on File \ New Task (Run…). In the Create New Task window, type explorer.exe. Click OK.
shell3.png

Windows Explorer Shell will restart, displaying the desktop and all applications that were open before it froze. At this point, it's best to save any data and continue working.
Read rest of entry

all about thumbs.db


Thumbs.db is a hidden file generated automatically by Windows, you will see it in many folders if you have set the "Show hidden files and folders" option in the "Folder Options" window on. Although Windows mostly generates it to speed things up, some times it is annoying especially when you try to zip a folder or upload a folder using ftp to your site, I have found Thumbs.db in most of the folders in my site and had to delete them manually. If you delete Thumbs.db from your windows folders, Windows will generate it again when you re-open the folders if you have Filmstrip or Thumbnails selected in the View menu of those folders. If the Thumbs.db is considered annoying for you, there is an easy way to stop Windows from re-generating it, here is how.

1. Open any folder and click Tools > Folder Options.
2. Click the View tab from the Folder Options window.
3. In the Advanced Settings check "Do not cache thumbnails".


You can choose "Show hidden files and folders", search for Thumbs.db files and delete them all, using the previous steps windows will not generate it again. You can choose "Show hidden files and folders", search for Thumbs.db files and delete them all, using the previous steps windows will not generate it again.
Read rest of entry

unhiding the folder options


some virus usually disables the 'folder options' in our system .They hide them to protect their anonymity .

SO here is the method to get back "folder options" which helps us to c hidden files and to know the file extensions which are potentially harmful to us.

Start -> run -> gpedit.msc
Have a look in the group policy in
"Administrative Templates -> Windows Components -> Windows Explorer"
disable "Removes the Folder Options menu item from the Tools menu"

OR

Edit the registry to get the folder options back.
Go to Start -> Run -> regedit and click Ok.
Find the following key: HKEY_CURRENT_USER\Software\Microsoft\Win
dows\CurrentVersion\Policies\Explorer
Find the NoFolderOptions key and change the vaule to 0 assuming you have this registry key.
Restart your computer
Read rest of entry
 

Computers made easy 4all Copyright © 2009 Gadget Blog is Designed by Ipietoon Sponsored by Online Business Journal